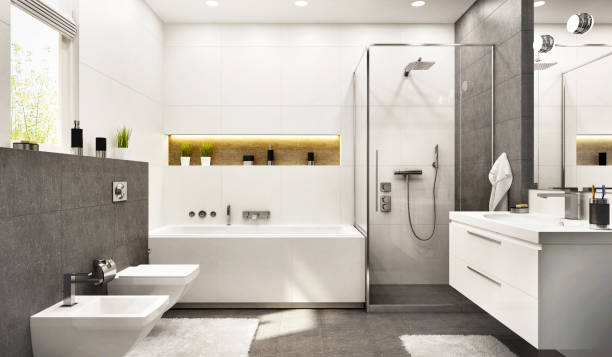
Do You Install Bathtub Before Drywall? Expert Insights in Portland, Oregon
")
Installing a bathtub before drywall is a crucial step in any bathroom renovation or construction project. It ensures that the bathtub is securely and properly installed, avoiding potential issues down the line. But why is it important to install the bathtub before drywall?
By installing the bathtub before drywall, you can access all necessary plumbing connections easily. This allows for proper positioning and alignment of pipes, faucets, and drains without any hindrance from the drywall. Installing the bathtub early on gives you more flexibility in terms of adjusting its position or making any necessary modifications during the construction phase.
In the following sections, we will delve deeper into these advantages and outline step-by-step instructions for installing a bathtub before drywall. If you're planning a bathroom renovation or construction project, read on to discover why this installation method is worth considering and contact Bathrooms by RUPP to make it a reality!
Proper Placement of Drywall for Tub and Shower Walls
To ensure the longevity and functionality of your bathroom, it's crucial to understand the proper placement of drywall around tub and shower areas. This not only involves positioning the drywall correctly but also considering factors like plumbing fixtures and water damage prevention.
Correct Positioning of Drywall
It's essential to follow a few guidelines:
- Measurements matter: Before installing the drywall, accurately measure the dimensions of your bathtub or shower area. This will help determine the size of panels needed and ensure a precise fit.
- Leave space for movement: Allow a small gap between the tub or shower unit and the drywall. This space accommodates any slight movement or settling that may occur over time.
- Protect against moisture: Use a moisture-resistant green board or cement backer board instead of standard drywall in wet areas like showers. These materials are designed to withstand moisture exposure, preventing mold growth and water damage.
Ensuring Adequate Space for Plumbing Fixtures
During installation, it's important to consider plumbing fixtures such as faucets, showerheads, and drains. Here are some tips to ensure there is enough space for these components:
- Plan ahead: Before installing the drywall, consult with a plumber to determine the exact location of plumbing fixtures. This will help you avoid any conflicts between the fixtures and the drywall.
- Create access panels: Install removable access panels near plumbing fixtures so that they can be easily accessed for repairs or maintenance without damaging the surrounding drywall.
- Cut holes carefully: When cutting holes in the drywall for plumbing connections, take precise measurements to avoid making them too large or too small. A snug fit ensures a secure connection while minimizing potential leaks.
Tips for Avoiding Future Water Damage to Drywall
To protect your drywall from water damage, consider the following suggestions:
- Apply waterproofing: Before installing the drywall, apply a waterproof membrane or sealant to the studs and surrounding areas. This provides an extra layer of protection against moisture infiltration.
- Properly install tile or shower surrounds: If you're planning on tiling the walls around your tub or shower, make sure it is done correctly. Improperly installed tile can lead to water seepage behind the walls, causing damage to the drywall.
- Regular maintenance: Keep an eye out for any signs of water damage, such as discoloration or soft spots in the drywall. Promptly address any issues by repairing or replacing damaged sections to prevent further damage.
Choosing the Right Backer Panels: Fiber-Mat Reinforced Cementitious vs. Fiber Cement Board
One important consideration is the choice of backer panels for the walls. Two popular options are fiber-mat-reinforced cementitious panels and fiber cement board. Let's take a closer look at these materials and the factors you should consider when selecting them.
Both fiber-mat-reinforced cementitious panels and fiber cement boards have their own set of advantages and disadvantages. Understanding these differences will help you make an informed decision for your project.
Fiber-Mat Reinforced Cementitious Panels
Pros:
- Excellent moisture resistance: These panels are designed to withstand high levels of humidity, making them ideal for wet areas like bathrooms.
- Enhanced durability: The combination of fibers and cement in these panels provides exceptional strength, ensuring long-lasting performance.
- Easy installation: With their lightweight nature, fiber-mat-reinforced cementitious panels are relatively easy to handle and install.
Cons:
- Limited availability: Finding these specific panels may be challenging, depending on your location. However, they are commonly available in many regions, including Portland, Oregon.
- Higher cost: Compared to other options like fiber cement board or traditional drywall, fiber-mat-reinforced cementitious panels tend to be more expensive.
Fiber Cement Board
Pros:
- Moisture resistance: While not as resistant as fiber-mat-reinforced cementitious panels, fiber cement board still offers good protection against moisture damage.
- Versatility: These boards can be used in various applications beyond tub or shower surrounds, such as exterior siding or flooring underlayment.
- Cost-effective option: Fiber cement boards are generally more affordable than some alternative materials like tile or stone.
Cons:
- Installation challenges: Fiber cement board can be heavier and more difficult to handle during installation, requiring additional support.
- Limited design options: Unlike tile or other decorative materials, fiber cement board has a more limited range of styles and finishes available.
Factors to Consider When Selecting Backer Panels for Tub or Shower Walls
When deciding between fiber-mat-reinforced cementitious panels and fiber cement board, there are several factors you should take into account:
- Moisture resistance: Consider the level of moisture exposure in your bathroom or shower area. If you anticipate high humidity or frequent water contact, opting for the superior moisture resistance of fiber-mat-reinforced cementitious panels may be beneficial.
- Installation ease: Evaluate your DIY skills and the complexity of the project. If you're looking for a straightforward installation process, fiber-mat-reinforced cementitious panels might be the better choice due to their lightweight nature.
- Budget: Assess your budgetary constraints and compare the costs of both options. While fiber-mat-reinforced cementitious panels may have a higher price tag, they offer enhanced durability that could potentially offset long-term maintenance costs.
- Availability: Check local suppliers or contractors in your area to ensure that your preferred backer panel option is readily accessible.
By considering these factors, you can make an informed decision about which backer panel material suits your needs best.
Step-by-Step Guide: Preparing and Installing the Front Wall Panel
To ensure a successful installation of your bathtub surround panel, it's crucial to properly prepare the front wall. This section will provide you with detailed instructions on how to prepare the front wall for panel installation, along with tips to ensure a secure attachment.
Detailed Instructions on Preparing the Front Wall for Panel Installation
- Start by measuring the dimensions of your front wall accurately. Use a tape measure to determine the height and width of the area where you'll be installing the surround panel. Taking precise measurements is essential to ensuring a proper fit.
- Once you have measured the area, mark those dimensions on your chosen material for the front wall panel. This could be drywall, cement board, or any other suitable material that can withstand moisture.
- Use a utility knife or saw to cut the material according to your marked dimensions. Take care to make clean, straight cuts for a professional finish.
- Before attaching the panel, it's important to prime or paint both sides of it. Applying primer or paint will help protect against moisture damage and enhance its durability.
- Next, position the prepared front wall panel in place against the framework of your bathroom walls. Ensure it aligns perfectly with adjacent side walls and back wall panels, if applicable.
Proper Measurement Techniques to Ensure Accurate Fitment
- When measuring for your front wall panel, always double-check your measurements before cutting any materials. Even small inaccuracies can lead to significant issues during installation.
- Consider using pilot holes when attaching the front wall panel to prevent splitting or cracking of materials such as drywall or cement board. Pilot holes also help guide screws into place more easily.
- If you're working on new construction or remodeling an existing bathroom, make sure that all necessary plumbing and electrical work has been completed before installing your front wall panel.
Tips for Securely Attaching the Front Wall Panel
- Use an appropriate drill bit to create pilot holes in the marked locations on your front wall panel. Pilot holes should be slightly smaller than the diameter of the screws you'll be using.
- Position the front wall panel against the framework and insert screws through the pilot holes into the framework. Make sure to tighten them securely, but avoid over-tightening, as this can damage the materials or cause misalignment.
- If your bathtub surround includes glass panels, follow manufacturer instructions for proper installation techniques. Glass panels often require specialized hardware and adhesive products for secure attachment.
By following these step-by-step instructions, you'll be well-prepared to install your front wall panel for a professional-looking bathtub surround in your Portland, Oregon, home.
Understanding Green/Blue Drywall and Moisture Issues in Bathrooms
In bathrooms, moisture is a common problem that can lead to mold and mildew growth. To combat this issue, many homeowners wonder if they should install the bathtub before the drywall. Let's delve into the topic of green or blue drywall and how it can help address moisture-related concerns.
Explanation of Green/Blue Drywall's Moisture-Resistant Properties
Green or blue drywall, also known as moisture-resistant drywall, is specifically designed for areas with high humidity levels, such as bathrooms. It contains additives that make it more resistant to moisture compared to regular gypsum boards.
This type of drywall has a water-resistant core that helps prevent water absorption and subsequent damage. It also features a protective face that acts as a vapor barrier, reducing the likelihood of moisture seeping through the wall.
Common Moisture-Related Problems in Bathrooms
Bathrooms are prone to moisture-related issues due to their frequent exposure to water. Without proper precautions, these problems can lead to costly repairs and health hazards. Some common bathroom moisture issues include:
- Mold and Mildew Growth: Excess moisture in bathrooms creates an ideal environment for mold and mildew to thrive. These fungi not only damage surfaces but also pose health risks.
- Peeling Paint or Wallpaper: High humidity levels can cause paint or wallpaper to peel off walls, giving your bathroom an unsightly appearance.
- Warped or Damaged Drywall: When exposed to prolonged moisture, standard drywall can become warped or damaged, compromising its structural integrity.
How Green or Blue Drywall Can Help Prevent Mold Growth
Green or blue drywall offers several advantages when it comes to preventing mold growth in bathrooms:
- Moisture Resistance: The core formulation of green/blue drywall makes it highly resistant to water absorption. This reduces the chances of mold spores finding a suitable environment to grow and multiply.
- Vapor Barrier: The facing on green or blue drywall acts as a vapor barrier, preventing moisture from penetrating the wall cavity. This helps maintain the integrity of the drywall and reduces the risk of mold growth behind the walls.
- Enhanced Durability: Compared to regular drywall, green or blue drywall is more durable in humid conditions. It can withstand moisture without warping or deteriorating, ensuring long-term protection against mold and mildew.
- Peace of Mind: By installing moisture-resistant drywall in your bathroom, you can have peace of mind knowing that you've taken proactive measures to minimize the risk of mold growth and associated problems.
Drywall Alternative: Benefits of Direct-to-Stud Tub or Shower Surrounds
You may be wondering about the best approach. One option that offers several advantages is using direct-to-stud surrounds. These surrounds are installed before the drywall and provide increased durability and stability. Let's dive into the benefits of choosing direct-to-stud tub or shower surrounds over other options.
Increased Durability and Stability
One of the main advantages of direct-to-stud surrounds is their ability to provide increased durability and stability. By attaching directly to the studs, these surrounds create a solid foundation for your bathtub or shower. This ensures that there is minimal movement or flexing, reducing the risk of cracks or leaks over time. With direct attachment to the studs, you can have peace of mind knowing that your tub or shower will remain sturdy and secure for years to come.
Simplified Installation Process
Another benefit of direct-to-stud tub or shower surrounds is the simplified installation process they offer. Compared to other options that require additional steps, such as applying cement board or moisture barriers, direct-to-stud surrounds streamline the installation process. With fewer steps involved, this not only saves time but also reduces the chances of errors during installation.
Here are some key points regarding the simplified installation process:
- Direct attachment: The surround attaches directly to the studs without requiring additional materials.
- Waterproofing: Some direct-to-stud surrounds come with built-in waterproofing features, eliminating the need for separate waterproofing membranes.
- Versatility: These surrounds can be installed in both new construction projects and remodeling jobs.
Time and Cost Efficiency
Direct-to-stud tub or shower surrounds also offer time and cost-efficiency benefits. The simplified installation process means less labor-intensive work and fewer materials are needed. This can result in reduced overall project costs and shorter installation times, allowing you to enjoy your new bathtub or shower sooner.
Versatility and Design Options
Direct-to-stud surrounds come in a variety of designs, styles, and finishes, allowing you to choose the one that best suits your aesthetic preferences. Whether you prefer a sleek and modern look or a more traditional design, there are options available to match your taste. These surrounds can be customized to fit different sizes and configurations, ensuring a perfect fit for your bathroom space.
Process of Installing a Direct-to-Stud Tub or Shower Surround
Installing a direct-to-stud tub or shower surround is a relatively straightforward process that can be accomplished with some basic tools and materials. Here's a step-by-step guide to help you through the installation:
- Prepare the area: Before installing the surround, make sure the area is clean and free from any debris. Remove any existing trim, drywall, or tile around the bathtub or shower base.
- Measure and mark: Take accurate measurements of the dimensions of your tub or shower area. Use these measurements to mark the locations for studs and flanges on the surrounding walls.
- Install the studs: Begin by installing new studs if necessary. Make sure they are plumb and securely attached to the wall framing using appropriate screws or nails.
- Attach flanges: Next, attach flanges to each stud at the appropriate height according to your tub or shower surround kit's instructions. These flanges will provide support for the surrounding panels.
- Cut panels: Measure and cut your direct-to-stud surround panels according to your marked dimensions. Use a utility knife or saw to make precise cuts.
- Apply adhesive: Apply construction adhesive generously on each panel's backside before positioning it against the wall studs and flanges.
- Secure panels: Press each panel firmly against the wall, ensuring it aligns with adjacent panels and fits snugly into place.
- Add trim pieces: Once all panels are in position, add any trim pieces provided with your surround kit to cover seams between panels for a finished look.
- Waterproofing measures: To ensure proper waterproofing, apply silicone caulk along all edges where water could potentially seep through, such as corners and joints between panels.
Necessary Tools and Materials Required for the Installation Process
To successfully install a direct-to-stud tub or shower surround, you will need the following tools and materials:
- Tape measure
- Level
- Utility knife or saw
- Construction adhesive
- Screws or nails for securing studs
- Silicone caulk for waterproofing
Important Considerations During the Installation
During the installation process, it's essential to keep a few important considerations in mind to ensure a successful outcome:
- Follow manufacturer instructions: Always refer to the specific instructions provided by your tub or shower surround kit manufacturer. These instructions may vary slightly depending on the brand and model.
- Properly waterproof: Proper waterproofing is crucial to prevent water damage and mold growth. Be diligent in applying silicone caulk along all seams and edges where water could potentially penetrate.
- Check for levelness: Use a level frequently throughout the installation process to ensure that your panels are straight and level.
- Take safety precautions: Wear appropriate protective gear, such as gloves and safety glasses, when handling tools and materials during the installation.
By following these steps, using the necessary tools and materials, and paying attention to important considerations like waterproofing measures, you can successfully install a direct-to-stud tub or shower surround in your Portland, Oregon, home remodeling project.
Summary: Key Takeaways on Bathtub Installation Before Drywall
Installing a bathtub before drywall has several advantages, including easier access to plumbing and fixtures, proper sealing of the tub, and avoiding potential damage to the drywall during installation. Proper planning and preparation are crucial for a successful installation, considering factors such as the layout of the bathroom and accessibility for future repairs.
Importance of Proper Planning and Preparation
Before installing a bathtub or drywall in your Portland, Oregon, home, it is essential to plan and prepare adequately. This involves measuring the space accurately, ensuring proper alignment with other fixtures like sinks or toilets, and determining the best location for plumbing connections. Taking these steps will help prevent any issues that may arise later in the installation process.
Proper planning also includes considering accessibility for future repairs or maintenance. Installing a bathtub before drywall allows easy access to plumbing connections if any repairs or modifications are necessary down the line. This can save you time, effort, and potentially costly repairs in case any issues arise with your bathtub's plumbing system.
Considerations When Deciding on an Installation Order
When deciding whether to install a bathtub before drywall or vice versa, there are a few considerations to keep in mind:
- Plumbing: Installing the bathtub first allows for easier access to plumbing connections since there is no obstruction from drywall. It simplifies connecting pipes and ensures proper sealing around them.
- Protection: By installing the tub before drywall, you can protect both the tub itself and the surrounding area from potential damage that may occur during subsequent construction processes.
- Flexibility: Installing the tub early gives you more flexibility in terms of positioning it within your bathroom layout. You can make adjustments based on factors such as lighting, ventilation requirements, or personal preferences.
- Efficiency: Installing fixtures like bathtubs before drywall reduces overall construction time by eliminating additional steps required when working around finished walls.
While there are advantages to installing a bathtub before drywall, it is essential to consult with professionals or contractors experienced in bathroom renovations. They can provide valuable guidance and ensure that all necessary steps are taken to achieve the best results.
The Bottom Line: Do You Install Bathtubs Before Drywall?
It's crucial to consider the order of installation for optimal results. Installing the bathtub before drywall offers several advantages, including easier access and a more secure and stable foundation for your tub or shower surround.
By following the step-by-step guide we provided earlier, you can ensure a smooth installation process. Remember to choose the right backer panels and understand moisture issues in bathrooms. With these considerations in mind, you'll be well-equipped to tackle your bathtub installation project with confidence.
Step into luxury with Bathrooms by RUPP's exquisite solutions. Our experts are ready to turn your bathroom dreams into reality. Whether you're looking for a modern makeover, a spa-inspired retreat, or a functional space for the family, we've got you covered. Ready to transform your bathroom into a sanctuary of comfort and relaxation? Contact us today!
Ready to Design Your Bathroom?